


Gaming Performance Guide: Settings for Better FPS + Less Lag
Why Performance Tuning Matters More Than Hardware in 2026
Many gamers think performance problems mean bad hardware.
In reality:
Most FPS drops come from poor settings
Input lag often comes from software and network issues
Many systems leave 20–30% performance unused
This gaming performance guide focuses on settings that actually work, based on how modern game engines and GPUs behave in 2026.
FPS vs Lag: Know What You’re Fixing
Before changing settings, understand the problem.
Low FPS
Choppy visuals
Stuttering
Inconsistent frame pacing
Usually caused by GPU or CPU overload.
Input Lag
Delay between input and on-screen action
Feels “floaty” or unresponsive
Often caused by sync settings, background apps, or network delay.
Fixing the wrong problem wastes time.
Step 1: Start With the Biggest FPS Killers
These settings hit performance hardest across most games.
Turn These Down First
Shadows (High → Medium)
Volumetric lighting
Reflections
Ambient occlusion
Ray tracing (disable unless high-end GPU)
These options look great in screenshots—but cost massive FPS.
Settings With Low Visual Impact
Lower these without guilt:
Motion blur (disable)
Film grain (disable)
Depth of field (disable)
Chromatic aberration (disable)
You gain FPS and clearer visuals.
Step 2: Resolution & Upscaling (Smart FPS Boost)
Native Resolution Reality
Running games at native resolution is expensive—especially at 1440p and 4K.
Instead, use upscaling.
GPU Upscaling Technologies
Modern GPUs handle this extremely well.
NVIDIA DLSS
AMD FSR
Intel XeSS
Best practice:
Enable upscaling
Use “Quality” mode first
Adjust sharpening if needed
You often gain 20–40% FPS with minimal image loss.
Step 3: Texture Settings (Often Misunderstood)
Textures Do NOT Affect FPS Much
Textures mainly affect:
VRAM usage
Loading times
If your GPU has enough VRAM, keep textures high.
When to Lower Textures
If VRAM is maxed
If you see stuttering when turning camera
If you’re on older GPUs
Textures ≠ performance killer (usually).
Step 4: CPU & Background Optimization
Close What You Don’t Need
Before gaming, close:
Browsers with many tabs
Launchers running in background
Recording tools you’re not using
This reduces CPU spikes and stutter.
Windows Gaming Settings
Enable Game Mode
Disable unnecessary startup apps
Keep Windows updated (but avoid beta builds)
These changes don’t increase peak FPS—but they improve consistency.
Step 5: GPU Control Panel Tweaks (Often Overlooked)
Recommended Global GPU Settings
Prefer maximum performance
Low latency mode: ON (or Ultra, test per game)
Texture filtering quality: High performance
V-Sync: Off (use in-game options instead)
These reduce driver-level overhead.
Per-Game Profiles
Advanced users should create per-game profiles:
Competitive games → lowest latency
Single-player games → balance visuals and smoothness
This gives better results than one global setting.
Step 6: FPS Caps & Frame Pacing (Huge for Smoothness)
Why FPS Caps Help
Uncapped FPS causes:
Temperature spikes
Inconsistent frame pacing
Input lag fluctuations
Best Practice
Cap FPS slightly below monitor refresh rate
Example: 141 FPS for a 144Hz monitor
This improves smoothness more than chasing max FPS.
Step 7: V-Sync, G-Sync & FreeSync Explained
Traditional V-Sync
Removes screen tearing
Adds input lag
Avoid for competitive gaming
Adaptive Sync (Recommended)
G-Sync / FreeSync compatible monitors
Smooth visuals
Minimal added latency
Best combo:
Adaptive sync ON
V-Sync OFF in-game
FPS cap below refresh rate
This is the sweet spot in 2026.
Step 8: Network Settings for Less Lag (Online Games)
Reduce Network Latency
Use wired Ethernet
Avoid downloads while gaming
Restart router occasionally
Choose closest server region
Hardware upgrades help—but settings matter more.
In-Game Network Options
Enable network graphs
Choose low-latency modes
Avoid “auto” region selection if unreliable
Ping stability matters more than raw speed.
Step 9: Laptop-Specific Performance Tips
If You Game on a Laptop
Always play plugged in
Use performance power mode
Elevate laptop for airflow
Avoid soft surfaces (beds, couches)
Thermal throttling kills FPS faster than bad settings.
Step 10: Monitor & Input Settings (Hidden Lag Sources)
Monitor Settings
Use native refresh rate
Disable post-processing (overdrive extremes)
Enable low-latency or gaming modes
Input Devices
Use wired mouse for lowest latency
Reduce mouse software polling conflicts
Avoid USB hubs for critical peripherals
Small changes add up.
FPS Gains vs Visual Loss: Smart Trade-Offs
Setting Change FPS Gain Visual Impact
Shadows ↓ High Low
Ray tracing OFF Very high Medium
Upscaling ON High Very low
Motion blur OFF Low None
FPS cap Stability None
Always prioritize consistency over raw FPS.
Common Performance Myths (Stop Believing These)
❌ “Ultra settings are always best”
❌ “More FPS always means smoother gameplay”
❌ “Textures cause low FPS”
❌ “V-Sync is always bad”
Modern engines reward smart tuning—not extremes.
Real-World Example (Practical Insight)
A midrange GPU running:
Ultra settings: 55–65 FPS (stuttery)
Optimized settings: 85–100 FPS (smooth)
Same hardware.
Better experience.
That’s why settings matter.
When Settings Aren’t Enough
If you still struggle after optimization:
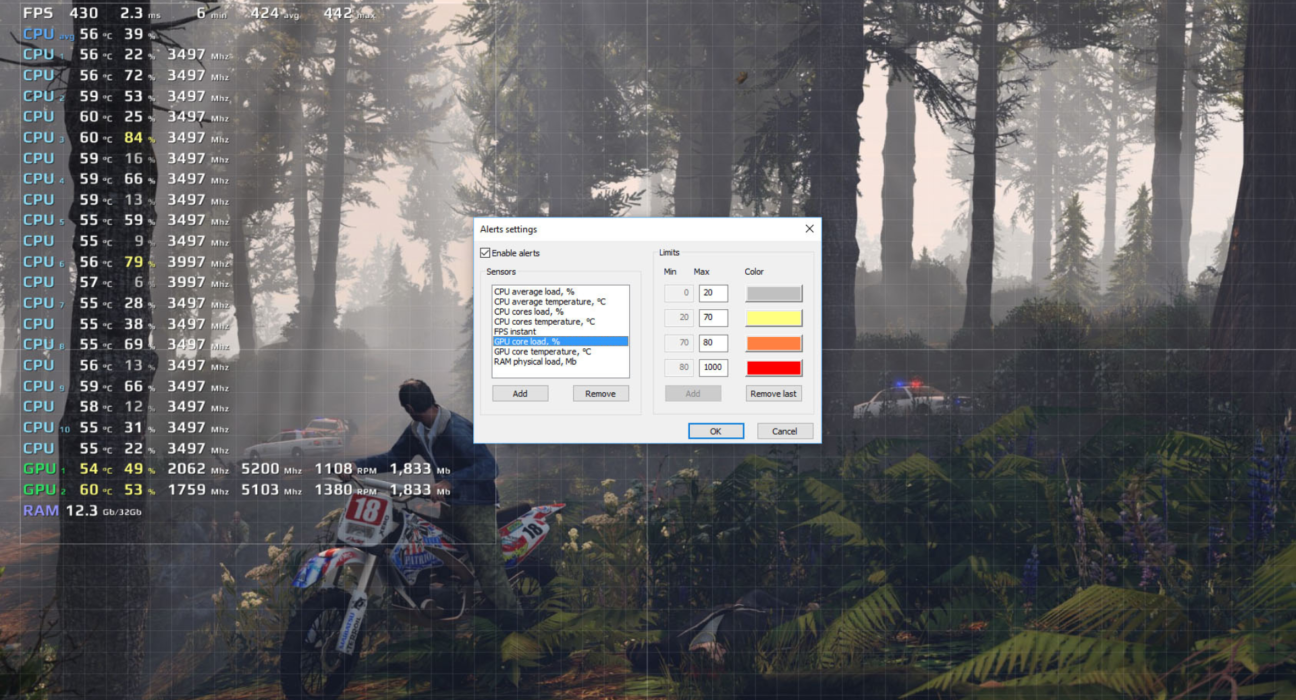
Check thermals
Update drivers (stable versions)
Monitor CPU/GPU usage
Consider RAM upgrades (16GB minimum)
Settings fix most problems—but not broken hardware.
Final Verdict: Gaming Performance Guide (FPS + Lag)
Better gaming performance isn’t about turning everything to low.
It’s about:
Knowing which settings matter
Using modern upscaling tools
Improving frame pacing
Reducing system and network latency
In 2026, smart optimization beats brute-force upgrades.